Thursday, August 15, 2019

Lines Unit: Realism

Choice Art Unit Line: Realism
Start at the top and work toward the bottom. 


Introduction to Element of Art
Artists use many types of lines to express themselves in artworks. 
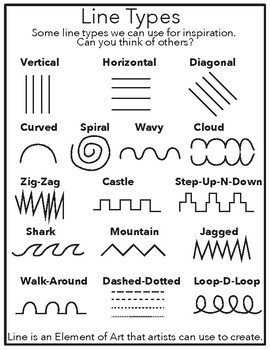
Watch the videos below to learn more about what kinds of lines artists use
and why they use them.

Check for understanding activity:
  1. Get an index card from the paper shelf
  2. Write your 1st and last name on the back
  3. Create an artist trading card using 3 kinds of lines.
  4. Put index card into your table folder when finished.
Image result for lines drawing


Research
The art theme you will be studying is realism.

Realism
Realistic art show items from the world as they really look.
Art example:

Cave Art : 1st art in the world
Research Activities

Visit the Lascaux caves online
To go into the cave Click here

Answer a question on google forms
about what you learned.
Click below


The artists you learned about showed “Persistence” in their work.
This means they did not give up.

Answer the essential question on a post it note:

Why is it important not to give up when you are creating an artwork?

Post it notes are on Mrs. Short's Table, turn in to your folder
Image result for post it notes


Plan
  1. Take an artwork planning sheet from the paper shelf.
  2. Put your 1st and last name at the top.
  3. Plan your WOW artwork.
  4. You can use the ideas below or create your own idea.
  5. Use the theme that you picked.

Meet with Mrs. Short

You need:
Planning Sheet 
Art portfolio

Bring these items to Mrs. Short’s meeting table. 
She has to approve your project idea. 

You will glue your planning sheet into your portfolio.  


Make
  1. Keep your portfolio in your table folder
  2. Pick items you need from the stations and bring them to your team table to work.
  3. Don’t give up on the first try.  Artists change artworks many times before they are finished.
  4. Work on your artwork until you are happy with it.
  5. Keep all work in your team folder


Reflect
Answer the question at the bottom of your
planning sheet about your artwork. 

Meet with Mrs. Short. 
Bring your finished planning sheet,
artwork, and portfolio to Mrs. Short’s table. 
You will meet with Mrs. Short
and glue those items into your portfolio. 


Share

Click the picture to goto see saw
Log into seesaw

Upload a photo of your work
to Seesaw by pressing the
green plus sign.

Fill out a peer review card
about another student’s artwork.

Turn the card into Mrs. Short. She will grade it and give it to the student for you. 


I am finished…. now what?
Take a planning sheet from the paper shelf and create another artwork.

Please follow the same steps that you did for the 1st artwork.